Apple describes iTunes as a “digital jukebox” that, at the most basic level, allows you to listen to
music. Songs that have been downloaded onto your computer, traditional audio CDs, and files
from external sources can be opened in iTunes using familiar stereo controls. Files can then be
saved on your hard drive or burned to CDs. iTunes 6.0 also allows you to listen to podcasts (free
audio programs) and watch videos.
iTunes is a member of the iLife ’05 software suite and can be used to gather music and other
o tracks for convenient access in iPhoto, iMovieHD, and iDVD.
…listen to CDs and other audio files in iTunes.
…create personalized playlists of your favorite songs.
…copy audio CDs to your computer’s hard drive.
…burn custom CDs to play in your car or home stereo.
…subscribe to and listen to free podcasted programs.
…watch video files through iTunes.
…use iTunes tracks in the other iLife suite programs.
iTunes comes preinstalled on most Macs, including the ones in the iSchool lab. iTunes 5.0, the
version used for the screenshots in this tutorial, is the version of the program currently available
on the Apple web site. Both Mac and PC compatible versions of the program are available for
. Also, if your computer has an older version of
iTunes, this link will allow you to upgrade to the newest version.
On a Mac, iTunes will launch itself when you insert an audio CD. However, if it
doesn’t open, there is an icon located in the dock.
On a PC, a dialog box may ask you what program to launch when you insert a CD. However, if
it doesn’t, you may need to select the iTunes icon from the desktop or Start menu.
Before we begin loading songs, let’s take a quick tour of the main iTunes window. For this
example, I’ve loaded the album Purple by Stone Temple Pilots so we can see how CDs and
tracks will appear in the program.
The first place we need to look is the far left column, labeled “Source.” This is where we will
locate our audio files.
The top six icons in the column (Library through Music Store) will always appear in the Source
column, although some of the lower icons may not.
is a compilation of the audio files on your hard drive. Adding songs to your library will
be discussed later.
are the Internet version of talk radio shows. To access these,
subscribe to shows through the Music Store (see below). Subscriptions to
podcasts are always free! For more information, see the Podcasts section.
purchased from the iTunes Music Store.
section.
variety of preprogrammed radio stations.
or entire albums for download.
The next option is the CD I inserted. I can select
and listen to the CD. Click on
the small “eject” symbol to the right of the title to eject the CD.
The next five icons (purple pages with a gear on them) represent smart playlists. These
will be discussed in more detail in the Special Playlists section. Basically, they are
playlists that dynamically update themselves.
The white page with a music note on it represents a user-created playlist. You can create
any number of these to fit whatever listening mood you’re in. Creating playlists will be
covered in detail in the Creating Playlists section.
Now that we’ve located the source of our music, take a look at the tracks themselves.
I’ve selected my CD in the Source column, so the center area of the iTunes window now lists the
CD’s tracks. Notice that iTunes automatically displays the track number, song title, track time,
artist, album title, and genre. If this information has not been located in the CDDB (see hint
below) or entered manually, these columns may be blank or labeled with a generic “Artist” or
“Track 01” entry. Homemade compilation CDs are usually displayed this way.
The blue speaker icon will appear beside a track when it is playing. Here, the highlighted
track, “Big Empty,” is currently playing.
Each track also has a checkbox beside it. Uncheck any songs that you don’t want to be
played. The checkboxes will also be useful later when we copy tracks to the hard drive
and burn CDs.
Extra Hint – CDDB The CDDB (Gracenote CD Database) is an online database containing information about audio CDs, most notably including track titles. Many audio programs, including iTunes, will connect to the database automatically (if an Internet connection is present) and try to match your CD to those entered in the database. If a match is made, iTunes will input information about the audio tracks for you.
Upper-Left Buttons: The buttons in the upper left corner of the iTunes window are similar to familiar stereo controls.
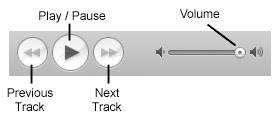
Previous Track: Upon one click, returns to the beginning of the currently playing track. With subsequent clicks, revisits previously played tracks.Play / Pause: Plays the selected track. Click again to pause the currently playing track.Next Track: Advances to the next track in the playlist.
Volume: Use the sliding circle to adjust the volume level.
Lower-Left Buttons:
The buttons in the lower left corner include some other familiar actions, like shuffle and repeat.
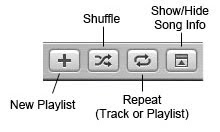
Add Playlist: Creates a new playlist in the Source column (see Creating
Playlists & Special Playlists for more information about playlists).
Shuffle: Plays the current track listing in a random order.
Repeat: Press once to repeat the entire track listing; press again to repeat the
current song.
Show/Hide Song Info: Displays and hides information and artwork for the
current track in the lower left corner of the iTunes window. This is also the
area where videos will begin playing.
Lower-Right Buttons:The buttons in the lower right corner aren’t used as frequently as some of the previous buttons.
The most frequently used of these is the Eject button.
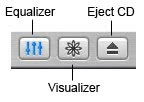 Equalizer:
 The equalizer allows you to adjust the levels of different components of audio tracks.
This is similar to adjusting the bass and treble on your home stereo.
Visualizer: The visualizer displays random color patterns in time with the track that is currently
playing. It does not display videos.
Eject CD: Opens and closes the CD drive. On a Mac, you will need to use this button or the
eject key on the keyboard to open the drive.
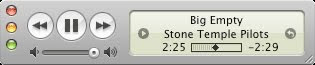
Progress Display:The rectangle at the top of the iTunes window shows the progress of the track that is currently
playing.

The top line of text displays the name of the track that is currently playing. The second line
cycles between the name of the artist and the album title.
The bar at the bottom of the rectangle has a small black diamond inside it. Click and drag the
diamond to move to a different point in the track. The time on the left side of the bar tells how
much time has elapsed in the track thus far. The time on the right tells how much time is left.
Click on the small triangle within a circle at the left end of the ellipse to display a visual
representation of the song.
 Information Bar:
The bar at the bottom of the iTunes window displays information about the playlist as a whole.
The total number of songs, total playing time, and total file size is displayed. Click on the bar to
change the total running time to an hh:mm:ss display.
 Mini Player:
To display a mini version of the iTunes window, click on the maximize button (the small green
button with a plus sign) in the upper left corner of the window. Click on the button again to
return the player to its full size.
You can also close the iTunes window while you’re listening to tracks. The program will
continue to run in the dock without displaying the window. The mini player is more convenient
if you want more control over which tracks are playing.
III. Opening Files
Audio CD:
On a Mac, press the eject key on the keyboard and place your CD in the disk tray. Pressing the
key again will bring the tray back in.
The computer will automatically display an icon for your CD on the desktop. It will most likely
be labeled “Audio CD.” If your computer is connected to the Internet, iTunes may automatically
search for the artist and title of the CD through the Gracenote CDDB® (CD database).

For example, I put Purple by Stone Temple Pilots into the drive and CDDB correctly
identified the CD.
Once iTunes launches, click on your CD’s icon in the Source column. This will list
the CD’s tracks. Double-click on a track to begin playing it, or highlight the track and
click on the Play button.
Homemade / Compilation CD:
Homemade CDs operate almost exactly like store-bought audio CDs. The major difference is
that their tracks will not be labeled. The computer may try to search the CDDB for information,
but compilation CDs will not be recognized.
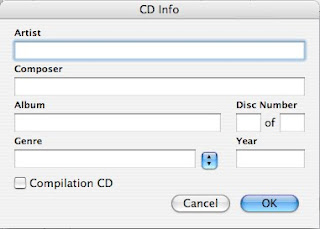
To enter information about your CD as a whole, right click on the CD’s icon and click “Get
Info.” The information entered here will be applied to each of the tracks.
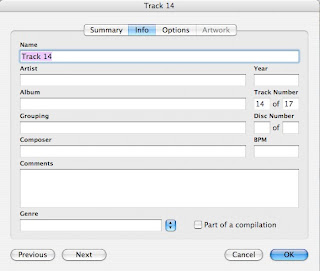
To enter information about a particular track, right click on the track and click “Get Info.” Here,
you can enter information that will only be applied to the selected track. If you want to add
information to several tracks (for example, all by the same artist), highlight the desired tracks,
right click, and select “Get Info.” The same window will appear, and any information entered
will be applied to all of the selected tracks.
 Data and MP3 CDs:
When you burn a CD, you can convert the files into audio format that can be played on home and
car stereos, or you can leave the files in .mp3 format. Leaving the files in this format allows
hundreds more songs to fit onto one CD. However, finding programs and stereos that can play
them is trickier.
When you put an .mp3 CD into your computer, iTunes may not launch automatically. On a Mac,
an icon for the CD will appear on the desktop. Drag the CD to the icon for iTunes in the dock
and release when the icon is highlighted. Or, you can click on the iTunes icon to open the
program.
A CD icon should appear in the Source column of the iTunes window. Highlight the icon and
you can listen to tracks, copy them to you library, and manipulate them just like tracks on a
traditional audio CD.
IV. Creating Playlists & Special Playlists
 Library:
Before you begin creating playlists, you need to add songs to your library. The library can be a
convenient place to store all of your music files and keep them organized.
To add files to your library, go to the File menu and select Add to Library. Here, you can select
which files you’d like to add to the library. Also, you can drag music files from a folder to the
Library icon in the iTunes window. You’ll notice a small green plus sign beside the file’s icon
when you have it in the right place. Another way to add files to the library is to drag their icons
to the iTunes icon in the dock.
 iTunes makes it easy to find the songs you’re looking for, even when
you’ve built up a large library. In the top right corner of the iTunes window
is a Search box. Here, you can type an artist, title, genre, or any other
comments that you’ve used to describe your music files. iTunes will list
any library items matching your search.
 To the right of the search box is a round button. When you’re in your library, thisbutton will have an eye on it; this is the Browse button. It allows you to browsethrough the artists, genres, and albums in your collection.
Extra Hint – Eliminating Duplicate Tracks So you’ve added your CD collection to your library and discover that you have several songs that appear more than once. Don’t feel like scrolling through dozens of tracks to hunt down duplicates? When you’re in your Library, just go to the Edit menu and select “Show Duplicate Songs.” iTunes will display the duplicate tracks for you so you can easily delete them.Creating Playlists:
To create a new playlist, click on the Add Playlist (plus sign) button in the bottom left corner of
the iTunes window. After naming your playlist, you can open your library or other playlists and
add tracks to it. Simply drag the desired track to the Source column and drop it into the new
playlist.
Party Shuffle:
Party Shuffle is a playlist that shuffles the contents of your entire library or another playlist.
Songs can be quickly added, reordered, and deleted.
At the bottom of the Party Shuffle window is an area that allows you to change the source of the
songs. You can choose your library or any playlist.

Notice that you can also designate how many upcoming and previously played songs will be
displayed. If you don’t want an upcoming song in the playlist, just highlight it and press delete.
The song will be removed from the party shuffle but not from your library.
Smart Playlists:
iTunes comes with several pre-created playlists, including My Top Rated, Recently Added, and
Recently Played. These are smart playlists that dynamically update themselves as you listen to
songs and change your library.
To create your own smart playlist, go to the File menu and select New Smart Playlist. Also, if
you hold down the option key (or shift key on a PC), the picture on the Create Playlist button in
the bottom left corner of the window will change from a plus sign to a gear. Click on the gear
button to create a smart playlist.
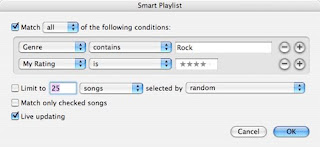
Here, you can specify criteria for the songs you want in your playlist. For example, here, I want
my playlist to include only my rock songs that I’ve rated with four stars. Now, whenever I add a
new Rock genre track and rate it with four stars, it will automatically appear in this playlist.
 V. Importing Tracks
iTunes can also be used to save tracks from audio CDs to your computer’s hard drive. By doing
this, you can store and listen to songs from all of your favorite CDs in one location.
When you open a CD in iTunes, the button in the top right corner of the window will become the
Import button.
In the track listing, make sure that all of the tracks you want to import have a checkmark
beside them . You don’t have to import an entire CD; you can pick and choose
tracks by checking and unchecking tracks.

Click the Import button, and iTunes will show you its progress as it saves the tracks to your hard
drive. The saved tracks will appear in your Library.
VI. Burning CDs
You can also use iTunes to burn CDs that can be played in your home or car stereo.
First, create a playlist of the tracks you want on the CD. Remember, recordable CDs will only
hold 80 minutes of playtime (some older CD-Rs will only hold 74 minutes, so check your CD to
verify its recording time). Look at the information bar at the bottom of the iTunes window to
find the length of your playlist.

Once you’ve compiled a playlist that you’d like to burn, insert a blank CD-R. The
large button in the top right corner of the window will now be a Burn Disc button.
Click on it once. This will not automatically begin the burning process.

The Burn Disc button will now be a radiation symbol that fades from yellow to red.
The progress display (the green-grey ellipse at the top-center of the window) will
remind you of how many tracks will be burned and the length of the playlist. It will
also remind you to insert a blank CD if you haven’t done so yet.

To proceed with burning the CD, click on the Burn Disc button again. If you want to cancel the
operation, click on the small X on the right side of the ellipse.
VII. Podcasts
Podcasts are audio programs and radio shows that you can download on a regular basis through
iTunes. With iTunes 6.0’s new video capabilities, you can also find a growing number of video
podcasts. These programs are free, but you do have to subscribe to them.

To browse Apple’s selection of podcasts, highlight the Podcasts icon in the source
column. The first time you click on this, a dialog box will appear giving you a little
information about podcasts; click on the “Go to Podcast Directory” button. Don’t worry if you
don’t see this window or accidentally close it; you can also click on the arrow next to “Podcast
Directory” just above the information bar to visit the directory.
Apple’s Podcast Directory has descriptions of some of the available podcasts and a listing of the
most popular programs. Click on a program or, in the top left column of the site, click on
Browse. If you select a program, its description and a listing of its episodes will appear.
Clicking on a category or searching will take you to an interface that allows you to browse
programs. (Note: This is actually the iTunes Music Store interface. Stay in the Podcasts genre
to ensure that everything listed is free.)
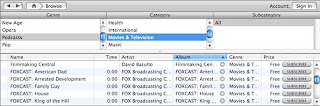
For example, I want to know what happened on last night’s episode of House. So, I’ll browse to
the “Movies & Television” category and scroll down until I find FOXCAST: House. If I click on
the arrow in the Album column, I’ll arrive at the site describing the program and a listing of its
most recent episodes.
You can download a single episode of a podcast by clicking on the GET EPISODE button or
subscribe to receive all future episodes. Some programs will only allow you to subscribe. To
subscribe to a program, click on the SUBSCRIBE button (found on the far right or in the
program description area).
You will now be taken to your Podcasts window. A small orange circle will rotate beside the
name of the program you just selected while iTunes downloads the most recent episode. A small
blue circle will appear when it is finished. Click on the grey arrow to the left of the program title
to view available episodes.
A quick note about Movie & Television podcasts: These programs may not be the actual audio of your television program or film. For example, the FOXCAST programs are descriptions of what happened in the episode by a narrator. Also, some programs are commentaries by actors and/or directors.
To play your downloaded programs, use the iTunes controls as if you were playing a regular
audio track. Once podcast files have been downloaded, you can add them to playlists and burn
them to CDs like any other track. We’ll learn more about playing podcasted videos in the next
section of this tutorial.

To check for new episodes of your subscribed programs, go to the Podcasts window
and click on the Update button in the top right corner. Programs with new episodes
available will, again, have a small blue circle next to them.
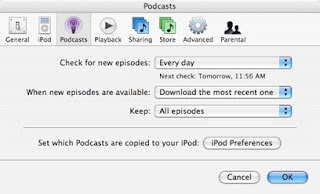
You can adjust how often iTunes will automatically update your podcasts. To do this, click on
the Settings button in the bottom right corner of the Podcasts window. Or, select Preferences
from the iTunes menu and click on the Podcasts icon.
 VIII. Videos
iTunes has a special interface for organizing and playing your video files. Your videos will also

be listed in your library and, if you subscribe to any video podcasts, in the Podcasts
section. You can identify video files by a small monitor symbol to the right of the title.
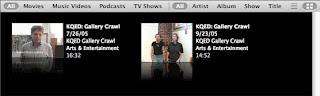
Highlight Videos in the source column. The Videos window has a special bar at the top of it that
allows you to sort your video files and display them in a list or icon format.

List view includes textual information about each track in a series of columns, just like the
displays of audio tracks in other sections of iTunes.

Icon view displays the same information about tracks alongside a small icon, usually a still from
the video.
Playing Videos
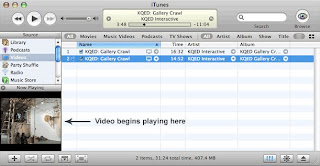
Playing a video in iTunes is much like playing a regular audio track. The play/pause, back, and
forward buttons all behave in the usual manner.
When you play a video, it will first appear in the bottom left corner of the iTunes window in the
Now Playing area.


 Playlist:


![[Valid RSS]](valid-rss.png "Validate my RSS feed")


